Welcome to Your Weekend Project, featuring how-tos and ideas from our archives for an organized and inspired home.
No doubt about it, when it comes to domestic efficiencies the fitted sheet is a dream invention. Yet, too often it’s an absolutely nightmare to fold. All those elastic edges just refuse to be tamed. Fortunately, there is a way.
With the help of my husband, Chad, here’s how to properly fold a fitted sheet.
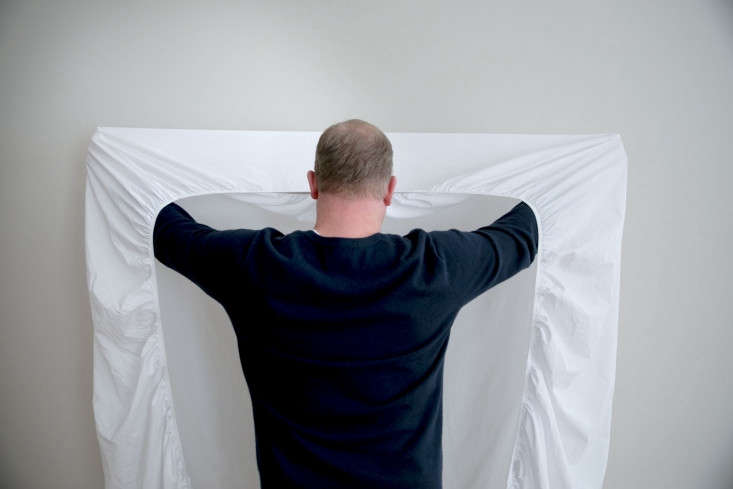
1. Hold the sheet with the elastic facing you.
Above: With the elastic side facing you, place your hands inside the top two corner pockets of the sheet.
2. Turn one corner pocket inside out and slip the other corner pocket inside of it.
Above: Turn the corner that’s in your left hand inside out, bring the ends together, and insert the right corner into the left pocket. Use your middle finger to make sure that the two corner points fit snuggly within each other. (Alternatively, you can fold the sheet in half. without turning the corner inside out, and then tuck one corner over the other.)
3. Run your hand from that doubled corner pocket to the next corner pockets.
Above: Keeping one hand inside the first corner pocket, run the other hand along the elasticized seam until it reaches the next corner pockets, turning your sheet as you go, and tucking one corner pocket inside the other. The sheet should now be folded in half, with the corner pockets tucked into one another at the top of the sheet, one hand in each.
4. Tuck the remaining elastic corners into the final corner pocket.
Above: With one hand in each doubled corner pocket, repeat Step Two: Turn one of the doubled corner pockets inside out, fold the sheet in half again, and tuck this corner pocket into the corner pocket you’re holding in your other hand. Now all your elastic edges should be in one neatly tucked corner.
5. Lay the sheet on a flat surface.
Above: Lay the sheet on a flat surface with the single corner pocket and elastic edges folded over so that the sheet is square. Smooth the sheet. Having eliminated the awkward shape caused by the elastics, you may proceed to fold your sheet as you normally would.
6. Fold the fitted sheet lengthwise.
Above: Using a neatly folded flat sheet as a size guide, fold the now-square fitted sheet lengthwise into thirds or quarters. Above: Folded into thirds.
7. Fold the fitted sheet again.
Above: Fold the sheet neatly along the length, perhaps using a folded flat sheet as a guide so that they match size-wise.
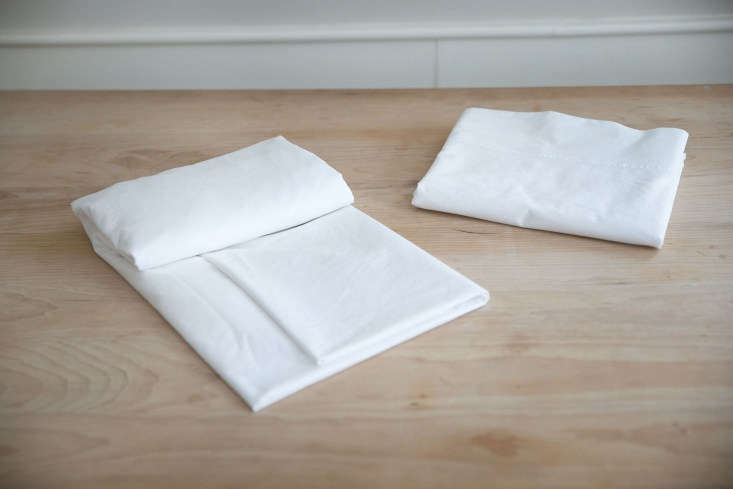
Final Results
Above: Properly folded, your fitted sheet should perfectly match your folded top sheet. Above: The finished product: properly folded fitted sheets are no longer an eyesore in the linen closet.
N.B.: This post is an update; it was first published on Remodelista on March 16, 2018.
When you register as a free Member of the Remodelista family of websites (Remodelista, Gardenista, and The Organized Home), you gain access to all current posts plus 10 archived posts per month, our internal bookmarking tool, and the community bulletin board.
Access 10 archived posts (older than one year) per month on each site
Use of our internal bookmark tool, so you can save products, posts, and other pages for quick reference
Access to our community bulletin board so you can ask and answer design-related questions
Unlimited access to the Product Catalogs, Design Travel sources, and Architect & Designer Directory listings
Choose from our ten newsletters to keep up with the latest on the sites
Or Subscribe for Maximum Value!
For $5/month ($59.99 paid annually) you'll enjoy unlimited, ad-free access to Remodelista, Gardenista, and The Organized Home and all the benefits of Membership.
Annual subscribers pay 50% off the monthly subscription price of $9.99
×
Subscribe to the Remodelista family of websites
For $5/month ($59.99 paid annually) you'll enjoy unlimited, ad-free access to Remodelista, Gardenista, and The Organized Home and all the benefits of Membership.
Annual subscribers pay 50% off the monthly subscription price of $9.99
×
Sorry! As a registered member you get 10 free posts from our archive (posts more than a year old) every 30 days. You have reached your limit for this 30-day period. If you would like to access unlimited posts from the archive (ad free, too), become a subscriber today, and keep reading as many articles as you want.
Full Access Individual Subscription
Benefits include:
Unlimited access to Remodelista, Gardenista, and The Organized Home sites
Ad-free browsing environment
Unrestricted access to 30,000+ archived posts
Receive the full-text daily newsletters
All features that Members have access to
Annual subscribers pay just 50% off the monthly subscription price of $9.99
Sorry! You have reached your limit of three (3) free posts from our archive every 30 days. You can increase this to 10 posts by joining as a free Member, or read unlimited posts with no ads by becoming a paid Subscriber.
Subscribe to the Remodelista family of websites
For $5/month ($59.99 paid annually) you'll enjoy unlimited, ad-free access to Remodelista, Gardenista, and The Organized Home and all the benefits of Membership.
Annual subscribers pay 50% off the monthly subscription price of $9.99
Become a Member at no charge
When you register as a free Member of the Remodelista family of websites (Remodelista, Gardenista, and The Organized Home), you gain access to all current posts plus 10 archived posts per month, our internal bookmarking tool, and the community bulletin board.


Have a Question or Comment About This Post?
Start the Conversation